Using WebDAV With ISPConfig 3 On Ubuntu 9.10
Version 1.0
Author: Falko Timme
 Follow me on Twitter
This guide explains how to set up and use WebDAV on a web site created with ISPConfig 3 on an Ubuntu 9.10 server. WebDAV stands for Web-based Distributed Authoring and Versioning and is a set of extensions to the HTTP protocol that allow users to directly edit files on the Apache server so that they do not need to be downloaded/uploaded via FTP. Of course, WebDAV can also be used to upload and download files.
I do not issue any guarantee that this will work for you!
1 Preliminary Note
I'm using an Ubuntu 9.10 server with the hostname server1.example.com here.
Because we must run all the steps from this tutorial with root privileges, we can either prepend all commands in this tutorial with the string sudo, or we become root right now by typing
sudo su
I'm assuming that ISPConfig 3 is already installed (according to The Perfect Server - Ubuntu 9.10 [ISPConfig 3]). I will enable WebDAV for the web site www.example.com / example.com (which was created using ISPConfig 3) which has the document root /var/www/clients/client1/web1/web (or /var/www/example.com/web which is a symlink to /var/www/clients/client1/web1/web).
The www.example.com / example.com vhost currently looks as follows:
cat /etc/apache2/sites-available/example.com.vhost
<Directory /var/www/example.com>
    AllowOverride None
    Order Deny,Allow
    Deny from all
</Directory>

<VirtualHost *:80>
      DocumentRoot /var/www/example.com/web

    ServerName example.com
    ServerAlias www.example.com
    ServerAdmin [email protected]

    ErrorLog /var/log/ispconfig/httpd/example.com/error.log

    ErrorDocument 400 /error/400.html
    ErrorDocument 401 /error/401.html
    ErrorDocument 403 /error/403.html
    ErrorDocument 404 /error/404.html
    ErrorDocument 405 /error/405.html
    ErrorDocument 500 /error/500.html
    ErrorDocument 503 /error/503.html

    <Directory /var/www/example.com/web>
        Options FollowSymLinks
        AllowOverride All
        Order allow,deny
        Allow from all
    </Directory>
    <Directory /var/www/clients/client1/web1/web>
        Options FollowSymLinks
        AllowOverride All
        Order allow,deny
        Allow from all
    </Directory>

    # mod_php enabled
    AddType application/x-httpd-php .php .php3 .php4 .php5
    php_admin_value sendmail_path "/usr/sbin/sendmail -t -i [email protected]"
    php_admin_value upload_tmp_dir /var/www/clients/client1/web1/tmp
    php_admin_value session.save_path /var/www/clients/client1/web1/tmp
    php_admin_value open_basedir /var/www/clients/client1/web1/web:/var/www/clients/client1/web1/tmp:/usr/share/php5


</VirtualHost>
|
2 Enabling WebDAV
We can enable the WebDAV modules as follows:
a2enmod dav_fs
a2enmod dav
Restart Apache:
/etc/init.d/apache2 restart
3 Configure The Virtual Host For WebDAV
Now we create the WebDAV password file /var/www/clients/client1/web1/passwd.dav with the user test (the -c switch creates the file if it does not exist):
htpasswd -c /var/www/clients/client1/web1/passwd.dav test
You will be asked to type in a password for the user test.
(Please don't use the -c switch if /var/www/clients/client1/web1/passwd.dav is already existing because this will recreate the file from scratch, meaning you lose all users in that file!)
Now we change the permissions of the /var/www/clients/client1/web1/passwd.dav file so that only root and the members of the www-data group can access it:
chown root:www-data /var/www/clients/client1/web1/passwd.dav
chmod 640 /var/www/clients/client1/web1/passwd.dav
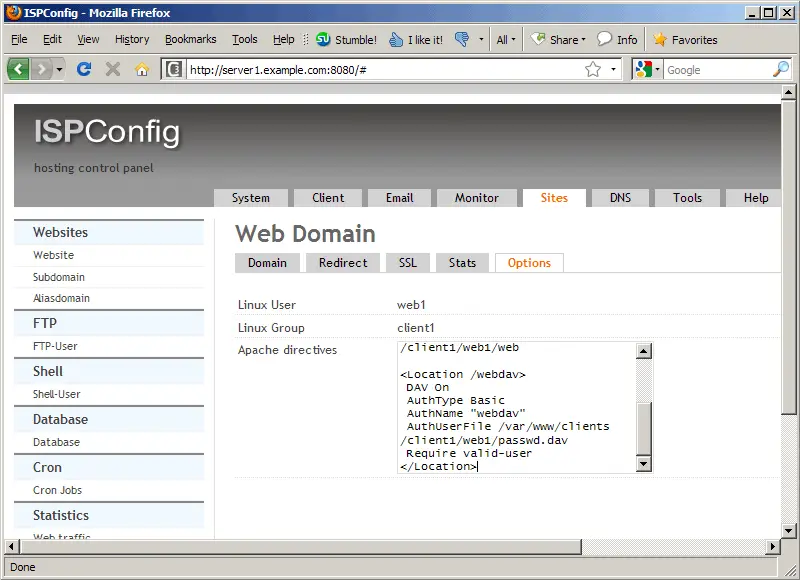
Now we go to the Options tab of the www.example.com / example.com web site in ISPConfig 3 and add the following lines in the Apache directives field:
<Directory /var/www/clients/client1/web1/web>
                Options +Indexes +MultiViews
</Directory>

Alias /webdav /var/www/clients/client1/web1/web

<Location /webdav>
 DAV On
 AuthType Basic
 AuthName "webdav"
 AuthUserFile /var/www/clients/client1/web1/passwd.dav
 Require valid-user
</Location>
|
The Alias directive makes (together with <Location>) that when you call /webdav, WebDAV is invoked, but you can still access the whole document root of the vhost. All other URLs of that vhost are still "normal" HTTP.
After a few moments (ISPConfig 3 needs to rewrite the vhost first), the final vhost should look like this:
cat /etc/apache2/sites-available/example.com.vhost
<Directory /var/www/example.com>
    AllowOverride None
    Order Deny,Allow
    Deny from all
</Directory>

<VirtualHost *:80>
      DocumentRoot /var/www/example.com/web

    ServerName example.com
    ServerAlias www.example.com
    ServerAdmin [email protected]

    ErrorLog /var/log/ispconfig/httpd/example.com/error.log

    ErrorDocument 400 /error/400.html
    ErrorDocument 401 /error/401.html
    ErrorDocument 403 /error/403.html
    ErrorDocument 404 /error/404.html
    ErrorDocument 405 /error/405.html
    ErrorDocument 500 /error/500.html
    ErrorDocument 503 /error/503.html

    <Directory /var/www/example.com/web>
        Options FollowSymLinks
        AllowOverride All
        Order allow,deny
        Allow from all
    </Directory>
    <Directory /var/www/clients/client1/web1/web>
        Options FollowSymLinks
        AllowOverride All
        Order allow,deny
        Allow from all
    </Directory>

    # mod_php enabled
    AddType application/x-httpd-php .php .php3 .php4 .php5
    php_admin_value sendmail_path "/usr/sbin/sendmail -t -i [email protected]"
    php_admin_value upload_tmp_dir /var/www/clients/client1/web1/tmp
    php_admin_value session.save_path /var/www/clients/client1/web1/tmp
    php_admin_value open_basedir /var/www/clients/client1/web1/web:/var/www/clients/client1/web1/tmp:/usr/share/php5

<Directory /var/www/clients/client1/web1/web>
                Options +Indexes +MultiViews
</Directory>

Alias /webdav /var/www/clients/client1/web1/web

<Location /webdav>
 DAV On
 AuthType Basic
 AuthName "webdav"
 AuthUserFile /var/www/clients/client1/web1/passwd.dav
 Require valid-user
</Location>
</VirtualHost>
|
Because mod_dav is running with the privileges of the Apache user and group (both www-data on Ubuntu), we must change the owner and group of the /var/www/clients/client1/web1/web to www-data recursively (otherwise you won't be allowed to create/edit/delete files/directories using WebDAV):
chown -R www-data:www-data /var/www/clients/client1/web1/web
Please note that this might cause problems for PHP files if you're running PHP via FastCGI, CGI or suExec. It's no problem if you're using mod_php.
You can now start using WebDAV as described in the chapters 5, 6, and 7 of the tutorial How To Set Up WebDAV With Apache2 On Ubuntu 9.10. The WebDAV URL is http://www.example.com/webdav/ for Linux clients and http://www.example.com:80/webdav/ for Windows clients.
4 Links
- WebDAV: http://www.webdav.org/
- Apache: http://httpd.apache.org/
- Ubuntu: http://www.ubuntu.com/
- ISPConfig: http://www.ispconfig.org/

